I had a rock ping my radiator in my 2012 Chevrolet Volt and it was leaking. I limped home in HOLD mode. The only code was "Service High Voltage System." I contacted the Volt Team that said it was safe to drive for 20 miles and the car would protect the battery. The average estimates I received ranged from $1200-$1500.00 including parts, labor, fees, and taxes to repair my 2012 chevrolet volt drive motor battery coolant radiator. First, if your vehicle is still under a manufacturer's warranty, make a small inquiry at one of the dealerships to see if it covers the radiator to be repaired.
I'm going to walk you through the steps of changing out your 2012 Chevy Volt radiator and the equipment that is needed to do this.
- Jack or RhinoRamps

- Cooling System Vacuum Purge Radiator Coolant Refill Tool Kit also known as a Vacuum Pump.

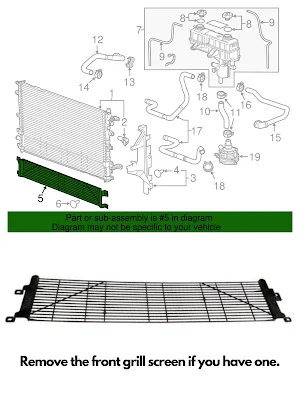
The part number that I had to replace was the 2011-2016 GM part #22765637 Drive Motor Battery Coolant Radiator. #16 on the above Diagram. I paid $185.62 but found it on Amazon a few dollars cheaper.
First, you will remove the shroud (cover.) You can use a flat head screwdriver to fit under the rivet clip to pop them up and pull them out.
Once you have removed all the clips and screws from the top of the front bumper, you will go to the undercarriage and use a 7mm wrench to remove all the 7mm bolts for the front bumper air deflector trim and the bottom cover.
Next, you will go to the wheel wells and remove the 4 front Torx Star bolts from the driver side and passenger side wheel liners.
To remove the bumper, "carefully" pull it off at each each corner wheel well. Then, disconnect the wiring harness connected to the bumper on the driver side and you can put it to the side. Now, we need to remove the support bracket and the hood latch.
- Place head of the vacuum pump into the top opening of the Coolant Reservoir.
- Attach the Venturi Tube, hose with the T-Shape, to the head and then attach the tube from your air compressor to the Venturi Tube.
- Turn on air compressor and open the valve above the head to allow the vacuum pressure to build.
- Watch the gauge allowing it to reach around 25hg. Once it reaches it, shut off the valve above the head to maintain pressure.
- Check to see if pressure maintained. If pressure is not maintained, inspect for leaks and repeat steps. If there is a leak and you cannot determine where it is, then proceed to next step with "WATER" instead of coolant.
- If pressure maintained, connect the fill hose to the head. Make sure you place the screened end into the very bottom of the coolant container you are using to pull in and fill the radiator system. Open the valve and slowly allow the coolant to be sucked into coolant system. (Do not allow the coolant level to fall below the screened end of the fill tube or air to enter the tube or you will lose pressure.)
- If coolant did not reach near the end of the container, repeat step 6. (Keep in mind you may still need to leave room to add water to make a 50/50 mixture if your vehicle requires it or the coolant is not already mixed.) If the coolant level is close to the screened end of the fill hose, shut off the valve, and take the fill hose off and keep the screened end turned upwards above the head to prevent air. Fill with Coolant mixture or water as necessary for your 50/50 mixture as needed per your owner's manual.
- Repeat until there is no longer any pressure. Once pressure is gone, place cap back on the coolant reservoir.
- If you do not have a way to clear the codes yourself, you should take it to the dealership and have them check.
- In a follow up blog, I will discuss how to find a coolant leak using a pressure tester.


No comments:
Post a Comment